Pages

Thursday, January 30, 2014

A peek into kid's room

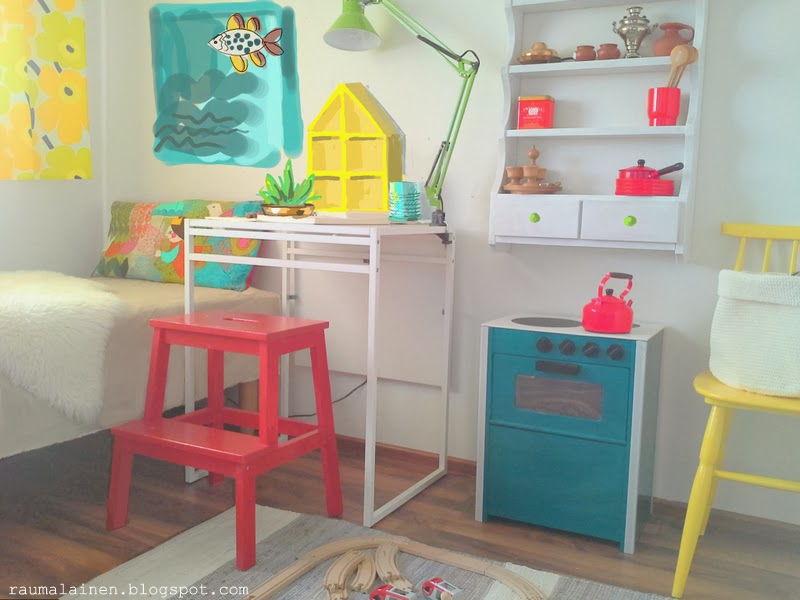
Now that's where the thrifted repainted cupboard has finally got installed - at the second long side of the room. The first long side was made back in August  - click here (by the way I apologize for those pictures  with weird sight angles from August 2013, I'll try to make better ones that would look more normal and keep you posted).

Basic concept for entire room:
The basic concept was taking "normal" furniture (by normal I mean not expressively childish, like scalloped, over-decorated, or only suitable for like couple of years). Which doesn't necessarily mean that the room has to look severe or neutral. By all means if there's something I didn't want the room to be, then neutral. My idea was taking timeless neutral pieces, that we can easily re-adapt into another age slice later, being neither girly, nor boyish, since we have a girl and a boy. Now there're pieces that can one day move into my studio or another room. 

Next step was going to add LOT of color to create a playful ambiance, and later to add some accessories to soften and round it all up. That's it!

Now about the kitchen nook and everything else around:
The kitchen nook BEFORE was a simple toy stove from BRIO, in red, and a plastic box filled with supplies, utensils and other pieces. Period.

The plastic box has gone and that nice upcycled thrifted cupboard has come in, repainted in white, filled with thrifted pieces to play with - in copper, wood, red plastic and pottery. 

The red BRIO stove has turned that deep teal shade - one coat of primer, two coats of aqua based, indoor gloss paint. First - the stove couldn't remain red (we already had some red pieces), second - the way BRIO made finishing and lettering was not awesome, AND the upper desk of that stove was simply bad. I've cut/sawn a piece of thin board, painted it white and glued three black circles made of adhesive black board foil. Now THAT'S the stove that makes me happy all way round!

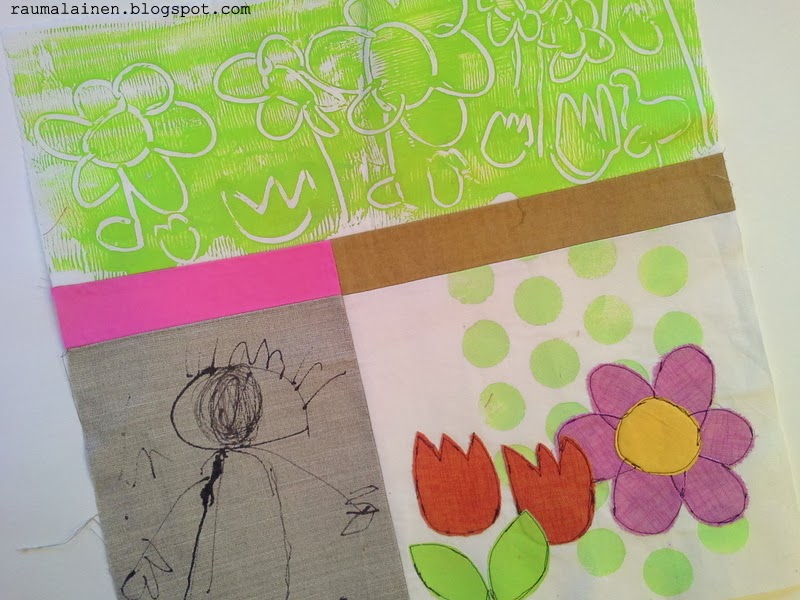
The yellow chair (thrifted and repainted) just takes on the color of our curtain panel  which I've made of MARIMEKKO fabric with Unikko motif by Maija Isola in happy yellow and light shiny green.

Now that's THE fabric I've never ever had imagined getting interested in, let alone purchase in my life before. BUT, living in Finland influences me in a way that I'm ready to take risks and going more unlimited with colors. This is my vitamin D, if you like. AND that Marimekko fabric has colors in it I've never seen in such intensity anywhere else, yes, those people know how to get hell out of it, the colours are pure pleasure and joy! You should have seen it in action - when the days are short and grey, with no decent sun rays for months, that bright curtain panel instantly illuminates the room, it's just THAT happy!

Styling ideas (to try out, look for/thrift, craft and blog about later)
That question is now about filling the space, because there're still big white wall spaces all around, and it looks colourful, but empty! I was thinking of something which would not necessarily include narrow shelves, filled with cute toys, lots of framed art, buntings, exposing books or alike - something that I DO love seeing anywhere else, but which would possibly make the room look too busy in real.

Photo shoot helped me better realize what could possibly be missing. Keeping in mind, that I didn't want it to turn too childish. Some more big color splashes placed on wall around that white extensible IKEA desk by the bed. So that's what that simple PS-rendering makes better understand.

I guess an upcoming project would be this fish painting in blue (Nr.1) to balance the teal stove, and a yellow display desktop box looking like a house (Nr.2) as an interlink between the yellow curtain panel and a yellow chair. A re-purposed can painted in light warm blue  - Nr.3 (near the yellow house, next to the desk lamp). And we also need a plant - a succulent (easy to care, robust). Preferably in a old thrifted copper vessel (Nr.4). Sounds like a LOT of new upcoming blog content!


Tuesday, January 28, 2014

NEW pillow #3 - OCEAN FISHES

As we've been making the pillow case surface for TURLUTUTU #2, my little girl asked me if she could draw a fish during the drawing session. And a fish she did. Three. On a piece of linen, with liquid fabric paint. And that got us started with another pillow - about OCEAN FISHES. I've taken her idea how to draw a fish, which I liked just THAT much, and I've made a simple sketch to develop that fish-y piece into a pillow case. Of course paying attention that we'd follow our work flow and would get something to stencil, to paint/print/monoprint, and to cut together.

Somehow it's not that fun anymore working alone, now it's more about collaborative projects.

Here're FOUR how-to-STEPS I'd like to focus on:

#1 first and foremost and the most stunning step was that fish drawing - black liquid paint on linen, as I said.

#2 then comes the upper part - like a miriad of fishes swimming in a ocean. I've made a paper stencil, and we mixed some nice shiny blue paint, then my little girl just screen printed a piece of white cotton with paint.

#3 a Big colorful Fish at the corner. My little girl drew a Big Fish with a pen on a piece of paper, that I just a bit re-adjusted for the project, then cut out in fabric, using different textures, colors, and following mainly, but not always her drawing (it's common project, remember, so I have right to also do what I want). Then we also bubble foil printed the body in navy blue (inspiration being taken from her drawing - see a black fish on linen with circles on it? That Big Fish has been free motion stitched with sewing machine. Same old, same old!

#4 grey-ochre-brown part with oval shapes, edged at extremities - that part was added at the end just to balance the whole piece and round it up. My little girl's part was to paint and bubble foil print in grey and ochre the oval pieces to mimic a fish shape. My part was hand stitching it onto brown corduroy in a very nice classic patchwork needle-turn technique. Recently I've seen how a very talented patchwork artist Nicole from french Bretagne creates wonderful items using this technique of applique, and I was amazed. Thank you, Nicole, for introducing your oeuvres to me and for your hospitality!

Back to the brown piece: it clearly needed a more elaborate finishing, and that traditional needle-turn method to make a hand applique was just perfect, otherwise the whole pillow would look crazy busy with all the black lines everywhere. See the close-up? It's AWESOME, I wonder why I didn't try it out earlier. It's so hand made, without looking sloppy, there's no machine in the world that would get you that clean and perfectly rounded pattern stitched onto fabric.

Anyway, that's all about the surface - we'd been working for several days with my little girl to finish it, and now tada - meet a very fish-y and nicely blue pillow. Backside - heavy linen, zipped and fully lined. 

Besides, don't you think we're getting a bit over top with making-a-pillow-a-week? Blame the weather, my friends, blame the weather! It's freezing outside, so a cosy wool blanket with nice colorful pillow, a cup of tea are just right to cuddle under and read a book together.

Monday, January 27, 2014

Mosaics with FIMO - #1

Here's how our FIMO mosaic adventure evolves. I had my FIMO mosaics cut, baked and ready-to-go, as well as a couple of second-hand frames, which I was talking about in a last post on mosaics. 

That one was thought as a pretty simple mosaic project - we've put glass nuggets evenly spaced over the frame, and FIMO colorful mosaics around to suggest flowers. I've been thinking about filling the resting space with mosaics, but after a couple of evenings watching those mosaic flowers, and playing around with different options, I didn't do this. 

It was really a no-brainer - all you need is actually to place the nuggets first, then you simply help your child to place the petals of FIMO mosaics around. That's it. We've let it dry over night, and then I put plaster around, washed, cleaned, put another coat, evened out as much as I could, washed, dried and sanded. 

It still looked unfinished, I sanded more, and painted the drawing mount, the frame boards (thrifted second-hand frame) in light old-rose shade, and also the borders of plaster - simply rubbing the paint with a sponge. It makes the flowers pop-up and stand out better.

After that I've started thinking that filling the entire surface with mosaic, carefully planning how to cover it all completely up is just not the way I want the mosaic to look like. I guess it's more fun just making some colorful statements on a surface in that technique. It's not that it's necessarily faster or easier, because afterwards you need to be more careful with putting plaster, sanding it, maybe painting/shading it. But at the end there's that fun not-really-mosaic-y piece, but rather something in mixed technique.

I love how the glass nuggets catch light, I love how the plaster looks neutral and makes the whole piece look undulating, rounded and irregular in kinda organic way. Filling it completely with mosaic pieces would possibly make it look rigid, maybe less interesting. 

Now about that project in particular - a simple ink drawing -#1, obviously not by me, then a drawing mount (cut, painted and patinated in old-rose by me) - #2, a frame with mosaic elements (made by us) - #3, then sanded and patinated by me, a name made in FIMO by my little girl - #4, and a bit patinated with acrylic color by me to soften the entire look.

That's it! I agree, that looking easy-n-simple project is quite demanding in terms of time, but think about how many fun steps (#1, #3 and #4) of working with your kid it involves - there're no fussy equipment, the techniques are simple and it just makes FUN. Go make it!


Friday, January 24, 2014

Thrifting for a kitchen nook (kid's room)

Remember, I was talking about thrifting for decorating/finishing my little girl's room? That's what was found at a flea market a couple of weeks ago - a WOODEN CUPBOARD - the fruit appear on the photo to give you a general idea of scale. The whole piece is about like 50 x 70 cm, I'd say, I haven't measured it. And look at those great curly lines, at the shape, isn't it just AWESOME?

It was dusty, coated with something like yellowy varnish, making it just look incredibly old. It was actually too small as a cupboard for adult kitchen, but perfect for child kitchen.

And here's what I did: cleaning, another cleaning, and another cleaning. Sanding, demoing the knobs, and coating with primer. Not so much, to let see the wood grain - that's something I love about old furniture, it's all about wood, good wood, solid processing, and it doesn't need to be coated that much. I wouldn't maybe paint it either, but it had to turn white. It's not like white washed, but you can still see the grain here and there after two slim coats of glossy white. Now I need to paint the new round knobs in contrast colour.

Now that brand new old cupboard gets filled. I went thrifting, back again.

I've found LOTS of weird items - like little copper toy vessels, a copper pan, a tiny replique of a russian samovar (about 12 cm height), some pottery in size and colour which I liked, a weird piece of finnish wooden cup - see by youself.

It all somehow looks weird, I know. Each time I look at it I think like "Oh my, I LIKE it, but it's WEIRD!". It's somewhere on the edge, when something is looking THAT disparate and unusual that you keep asking yourself if you LOVE it or HATE it.

Update: I got more thrifted items for that cupboard a couple of days ago, and yes, they are ALL weird, of course! I start thinking that I'd rather love than hate it. Come to see how the kitchen nook is going to look like next week!


Wednesday, January 22, 2014

Pillow case TURLUTUTU # 2

This one here is another pillow from the fun serie inspired by TURLUTUTU (see the post from the last week here). The first one appeared simply straightaway without much preparation, and for the second we just took a story, like Turlututu and Tarlatata (his little friend) are taking walk in tulip garden, just to narrow down all the options which appear pretty fast when you propose that kind of project to a kid. Like "No mommy, I'd rather draw a fish" or "Can I also draw something else onto monoprint plate? - What? - Bunnies!" - Bunnies?". But after she was aware about the leitmotif, she was ready to play the game and stick to tulips. 

And yes, of course there's been a fish drawing as well. Which got by the way the starting point for another fun sewing project. And we got a monoprint with bunnies either, which is just awesome and I'm thinking about framing it. Or maybe sew something else.

This time I made a quick drawing in PS, and we made together the decisions about colors, like "That tulip monoprinted piece - is orange or pink better?". It was fun and helpful.

The techniques here are all the same that we used in the previous one, I just want my little girl to know and understand them better and get more confident:

#1 free hand drawing with liquid paint directly on fabric (Turlututu and Tarlatata in black on natural linen),

#2 monoprinting on fabric (tulips in orange, the vertical piece on the left),

#3 stenciling (working with paper screens) - the olive green dots underneath the applique part, made with fabric paint and sponge. And we've also rolled some light olive green paint to make the backside for our "tulip garden" appliqué (this way the fabric tulips stand out better).

The last technique - making the applique  (#4) - is the most demanding one, so I help with cutting the fabric according to the drawing she makes. She made tulips (different colors) and leaves (orange blend), I cut them out and free motion stitched them with sewing machine.

Then I finished it trimming pieces to rectangles, sewing them together, adding the backside (pink corduroy), inserting the zipper and lining the case. And here we are with a happy new pillow!

Tuesday, January 21, 2014

Mosaic making with FIMO

This Christmas Santa's brought us a mosaic kit (for kids). A big cardboard box filled with LOT of supplies and pretty easy-to-go and everything included, like this one. Yes, it's for kids from 8 y.o., but with some help, encouraging and smaller steps (my little girl turns five this spring) it was a no-brainer. She was HUGELY motivated to do it ALL DAY LONG during holidays, so that I actually had to impose breaks. That all means I started thinking about how to continue the mosaic adventure, but with more freedom as a kit can offer.

About the bespoken kit - we've learned A TON about how to create the motifs on mosaic pretty fast without any pain or mistakes. No need of supply shopping, everything is included. I also appreciated the small scale of stones, so that you can create great composition on a not-so-big surface like jewelry box, a plate or a small mirror from the kit. I wouldn't buy it another time, for there've been some points bugging me, BUT still.... it's a GOOD starter kit, to see if mosaic is appealing to you and to get a right amount of basic knowledge to get more freelance.

A picky me wanted to try out wooden supports and really nice colors - teals, broken greens, pinks, softened orange, all the usual suspects if you follow me since a while.

Now let me be fast and short in my "how to put your own twist on mosaic" with help of FIMO (as opposed to what a kit can offer). Here's what I did:
  • Got blocks of FIMO soft in different shades.
  • Mixed them into six colors I needed.
  • Rolled, cut and baked them according to manufacture instruction.
  • Went thrifting and got some fun wooden supports and small wooden frames.
  • AND off it went into playing with different arrangements to see how it all comes out.
You should have seen the smile on my little girl's face happy about the brand new up coming mosaic project! She's gonna get a new project, we get some nice accessories, art directed by me or simply messy and improvisational, I get blog content and we have FUN! Win-win, isn't it?

See the happy mosaics coming out nicely with easy motifs? Stay tuned to see the results!

Monday, January 20, 2014

Oblong pillow case with BLUMENFEE

Somewhere in August 2013 I've shared the peeks from the makeover of my little girl's room.

I didn't have any particular mood board or Pinboard in mind back then, except that I wanted colour, bold pattern, strong contrasts, and that I could clean up everything quickly without much thinking, hence I wanted organisation.

Now since a couple of weeks I got back to that unfinished project - same leitmotif, new ideas, new pieces (flea market finds - old and not-so-old ones), happy me!

Since August each time I come into this room, I feel happy about the makeover start. Yes, a lot was left undone, but still I'm more like feeling happy about the accomplished part than unhappy/bummed about what was left undone. I needed a break back then and wanted to step aside and get back later with fresh mind and eyes. I haven't known "later" would come in half a year!

Now here's the trigger - the new oblong pillow case. I've done it recently and it got me thinking about how to style it right - like putting a bed into another corner, getting maybe nice night stand or rather some similar but more functional table, some accessories, something possibly old, vintage, thrifted. Finishing the kitchen corner, decluttering.

Do you ask me if my little girl needs all that drama about designing her room? NOPE! She's happy playing amidst plastic containers and completely immerged in her games, not caring for how the furniture pieces all work or not work together, let along curtains, linen bedding, having a perfect kitchen corner etc. Yes, I'm mostly doing it for my own pleasure, blame the selfish me!

There's gonna be at least one post on finishing the room coming soon, but for now just let me talk pillow! I'm so insanely in love with it (that's why there're many close-ups for more details). It's representing everything that I've learned, distilled and acquired of knowledge how to work with fabric in MY WAY, how to make my favorite techniques work together, how to work with composition, how to translate it into a fabric surface, so many how to's that took me months of errors, trials, unfinished or unsatisfying pieces.

I have painted first with a brayer, then I've hand printed flower motifs from my lino plates. Then came the hand doodled flower drawings. And at last came the appliqué, being free motion stitched. The backside is soft cotton corduroy in pink. That pillow case measures about 75 x 37 cm and is zipped and fully lined. Sounds short and easy, but for me it's just jam packed with colors I love, with patterns I love, with textures I love, it just makes me THAT happy!

Oh the happy, bright and colorful pillow with the Blumenfee (flower pixie) which is spicing up our little reading nook! Yes, it looks still somehow spartan now, but within a short time you'll see more!

Thursday, January 16, 2014

DIY tutorial with KIDs - pillow making

Interested how to make a cute little pillow for a child's room WITH lot of help of your offspring and to a huge joy of both of you? Go grab a cup of tea to read and get inspired! Please welcome to a short tutorial, or rather an overview of a project. I'm not making step-by-step pictures and explanations, that's why it's not going to be a classic tutorial.

I've provided first the basic idea of a pillow - sketch, then I've colored it in PS to visualize better, and sort of art directed the most of the process. The theme was inspired by TURLUTUTU - a fun hero of french children literature. Santa's brought us the book and off we went on different projects involving the TURLUTUTU, because it's just THAT awesome!

Now about the process itself. And be sure you make it in several days and not ask too much trying to get it done in one session, there's simply TOO much work for that.

There're FOUR different techniques, hence FOUR stages of working together with your child, and yes, we did it in four different sessions:

1) Making a hand drawing of TURLUTUTU with some watered down black fabric paint on a piece of natural linen. Just give your child the idea of what you want to get (a simple something what he/she draws eagerly - Turlututu in our case), and let him/her draw free, only paying attention to scale, because that's what is IMPORTANT for the final composition, not the perfect execution. Easy and fast.

2) Monoprinting. I'm not going to detail how to monoprint, go grab a couple of videos on youtube to get the general idea. It's really fun, I LOVE it, and it's certainly kid-friendly. Make it easy in suggestive way "Don't you think we could put a flower here, or maybe alternate the shape". The trick is not to get too precise like "You make this one here and now you stop and then I'll see", that's a kill-joy. It's not easy if you have a clear vision of your future piece, but pull back and let your child make mess, mistakes and have fun. That part may take longer - mixing paints is fun, rolling them onto plates as well, drawing into the wet paint - the most fun, pressing the fabric onto with a huge WOW afterwards - it's ALL FUN!

3) Stenciling (screen printing with paper stencils) I've cut it prior to work with my little girl out of paper with my x-acto knife. I took a thread bobine as a basic circle shape and repeated it. I wanted simple shapes and clear result. We mixed paint together and she stenciled the paint with a kitchen sponge through the openings. And we stenciled immediately some other surfaces, like paper scraps, that's THAT addictive once you get your hands on screen printing.

4) Making fabric appliqué - somehow not that easy part about suggesting to make flower patterns to cut them from fabric. We've drawn them on paper, but my little girl got in trouble cutting them well, so she got upset and wanted me to make the job. I didn't want intervene that much, so I suggested simply drawing the flowers on the backside of fabric. She made it. Fabric cutting was pretty difficult though for a four-year-old, so at this point I had to help. I simply followed her lines, and yes, we got that made-by-a-child look. I wanted to put them into composition that I had in mind, simply thanking her for help, but she rearranged them. I've free motion stitched the composition that she's chosen. It was different as mine, but I respect her wish to keep her hands on project since we both have equal rights to do what we want.

And that's it! We had THREE great pieces (ONE - black drawing, SECOND - monoprint, THIRD - paper screen circle print/stenciling with fabric appliqué). They turned out differently as I expected, but the way I liked. Those are techniques where a child can easily be involved, with some help and guidance. We spent maybe about 10-40 minutes on each piece/at each stage, cleaning included to make this fun pillow surface.

I've added some color splashes in pink and ochre to bond them together. Backside of the pillow is some yellowy golden ochre corduroy, the pillow is zipped and fully lined. And I'm really happy about that project we made together. So happy that we've started another one, about TURLUTUTU, of course.


Wednesday, January 15, 2014

DIY framing

Recently I've been thrifting and that's how I got a couple of new/old (depends on definition, and I got like half dozen to be honest) frames. Good condition, good so to speak bones, bad colour (not in itself, but for my project), some cheap inserts. That's been the start.

Remember, I've been talking about cards in my previous post. One of them was not a simple card, but a portrait according to my little girl. And off we went with a simple idea of framing that portrait as a gift.

I took acrylic paints, sanding paper, cardboard and cutting machine for photo mounts - that's how I've spent one evening measuring, cutting the mount, painting it, sanding and painting the frame, re-sanding, and re-painting in slightly another shade to enhance and give some patina. That's all. As easy as it sounds, believe me.

Meet a nice little present I'm so jealous about and would love to keep it for me. Except that it's not my piece of art, and I've been only framing it and playing with my flea markets finds (and there've been A LOT recently, follow the blog for updates!). Me so likey! Just that maybe for me I'd paint the frame and the mount in different shades of teal.


Tuesday, January 14, 2014

Cards and bookmarks DIY

During holidays time we've been trying to paint big with my little girl. The result was not THAT big as I've imagined, somehow she's been merely filling the BIG surface with LITTLE elements. Since we've filled them haphazardly with LOTS of things, they've been looking busy and not consistent. So we failed the BIG theme, but we've found another funny way of making use of that.

We've been working both on the same sheet at the same time, and made marks, bubble foil prints, hand free doodling etc. to each other's part - no fancy techniques that I'd control or had to guide, just simple surface filling. And yes, we stick to pink and  orange, but added some green afterwards.

I cut the sheet to cards (square about 15 x 15 cm), and bookmarks (about 20 x 4 cm) with my roller blade and patchwork rule. Lately we've been drawing a lot with ink and bamboo pen, it's just so shiny and differently black as opposed to the uniform black of felt tip pen. So we filled the cards and bookmarks with simple ink drawings. We've given them as season greeting cards and as little gifts to family and friends.

Meet happy cards and the happiest bookmarks ever!