Yes, it's finally happening, please excuse my late night post with no pictures. I'm not every so often here on the blog last couple of months, that's just a matter of time, and I'm working on getting more regular on schedule.
As long as I'm not, here's the way to fill the gap - go check my brand new INSTAGRAM feed.
See in the right side bar the "I'm instagramming now" with the new button VIEW ON INSTAGRAM below the aforementioned title? That's it!
I'm since about a week into it, and seriously in love, AND seemingly addicted. It's been quite awhile since I've been thinking about it, as of an outlet about documenting the daily life. The time is right to start, since my ramblings are numerous, and they do not quite fit into what this blog is about.
You'll see there's lot of stuff happening around while I'm not blogging - my INSTAGRAM feed is going to be about gardening, woodworking for other purposes than blog, sewing, knitting, randomness, peaks into creative processes and such. I'll be happy if you come over, comment and follow it, I keep it up to date daily.
See you on the INSTAGRAM!

Saturday, August 8, 2015
Sunday, July 26, 2015
Nursery gift - elephant stuffed toy
Hei there! Here's another occasion of making a welcome-baby gift for a friend.
We just got back home this week, after A MONTH being on what is normally called holidays. And that was fun-n-tough - like seeing all the family here and there, and endless talking and cooking together, and finding new inspirations, but also driving-flying-taking multiple trains-combos across half Europe with two small kids every ten days. Dealing with them being over-excited, over-tired, rude, screaming, not sleeping, eating candies, - like that's not your kids anymore. You certainly know what I mean - big, long family vacations, because a month like this is LONG. Happy time, exhausting time. Period. Now let's move on and get back to normal life.
So what is going on here? Remember, I told once, after I've made this elephant, that it was fun and I was thinking about making more of them?
That's it - a bit bigger, slightly different shape which is still simple but more adjusted. Stuffing a toy makes significant distortions of the flat shape, and this time I've tried to account for that. Still not quite perfect, on my opinion, so this elephant got some extra adjustment hand made seams here and there and a bit of photoshopping too, but less than the first one, so we're making progress here, hurray!
This time there's less patchworking, but more different fabric qualities, and some vintage finds as well - like this crocheted piece of a napkin. I have a small collection of them, which I have been hoarded since awhile. I'm glad they finally come in handy. There are embroided hot pink cotton, and fine alpaca wool, and fabrics from Liberty, Petit Pan, Marimekko, some corduroy, and fluffy organic cotton for ears, and linen, of course.
Stay tuned for other elephants, I hope this one is not going to be the last one.


Monday, June 1, 2015
Noah's Ark baby blanket - a patchwork quilt with monoprint
Let's move on with babyshower gift making – part #2.
Yesterday I was talking about making
gifts for a babyshower to the theme Noah's Ark. Here's the second gift.
First I had the wooden Ark, but it didn't get filled, though I spent some
thought on it. Here's the point - filling the Ark with animals
didn't feel right. But we had to have animals to correlate with the
theme. And so they come. On a blankie.
This project involved some
collaboration with kids. We made monoprints. I simply suggested they should make a drawing of an animal they like and want to draw,
but then repeat it, because Noah's Ark had them paired. And that's what I got: a pair of fish,
birds, sheep, giraffes, toucans, and unicorns. I had six kids
working on this project, aged five to eight, and we got twelve
drawings.
I could have found eight participants,
to make sixteen prints and perfectly fill the surface of sixteen
squares. Some Photoshop rendering prior to getting started with kids
to better visualise and find the right colors to mix proved quickly
that sixteen prints would make our blankie look busy and too
patchwork-y. A bit boring too. I introduced first simple squares of
solid cottons, matching the colours of monoprints, and after some
fine tuning and playing around how to complete the monoprints better
I've come up with those waves and playing elements on cords.
That sea element, referring to
a story of Noah, the greyish blue wave repeating at four squares holds the whole piece pretty well together, and bundles it. And this element induced the idea of making pockets. Playing pockets.
I filled two of them – I had a
leftover monoprint of a fish, so I made a soft a bit stuffed mini toy
(some padding added inbetween two layers of fabric – between linen backside and
printed surface). I had to sew an Ark, to thematically tie the
blankie to the wooden Ark. And it's attached to a cord, and can be
played with as well.
Yes, there was also some research on
Noah's Ark quilts, mostly on Pinterest, though less gainful than for
the wooden Ark. I've seen one, that had colored squares and white
animals in appliqué technique, cut of white plain fabric, and hand
applied onto the quilt. Pretty subdued in colors, with only different
animals and I quess it wasn't even brandmarked as a Noah's Ark quilt,
it was a simple animal themed quilt. But I loved the idea of colored
squares and white objects.
A couple of words on colours: we don't
know whether the baby is going to be a boy or a girl, because the
future mom-to-be doesn't want to know. They love blue, different
types of cold blue, and emeraud green, and they have a bit of red and
this soft pink around the house. That's where the color scheme came
from. Not a typical one for me, but as I said after playing around in
Photoshop, I've found the satisfying combination, both with „their“
colors and the way I loved it personally to engage and produce it. I
must say, I love this piece very much, and I hope it will bring joy
and happiness to the mom-to-be and her future baby.


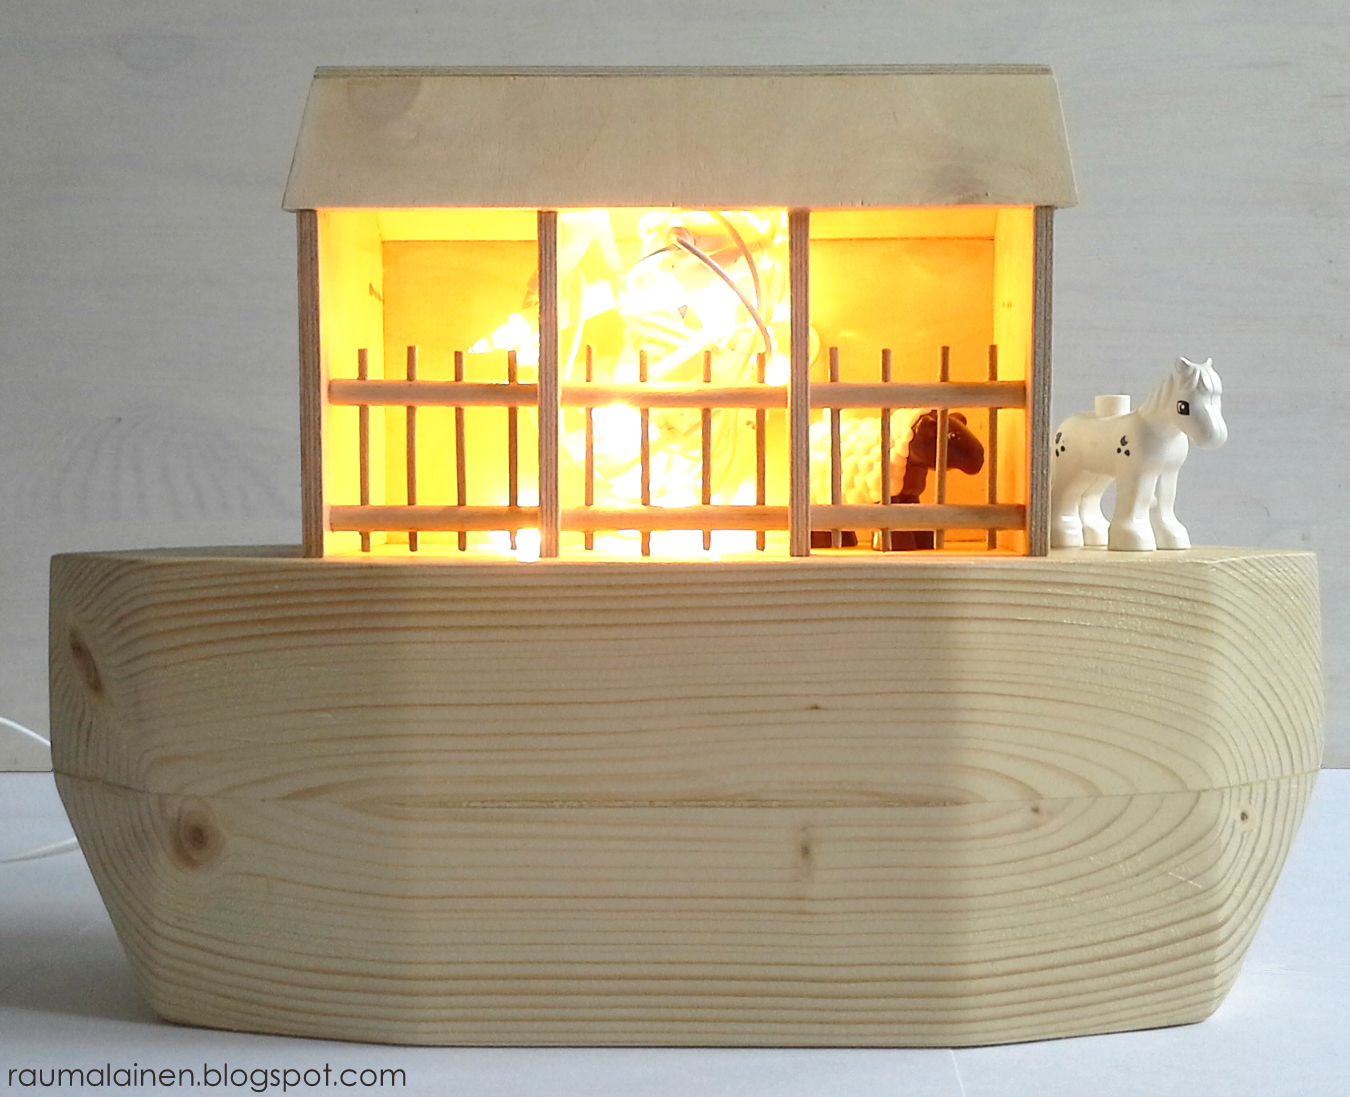
Sunday, May 31, 2015
Wooden Noah's Ark - night stand lamp - a NURSERY gift
Recently I had a babyshower in my
place for three of our friends-soon-to-be-moms. We made ONE common
celebration for three of them on one day, because they are going to
have their babies in summer, and many of us are making holidays
sooner or later, not all at the same time, so finding three different
dates for moms, and friends, AND making three planning lines AND crafting would otherwise be
tricky, if not impossible.
Yes, we had different themes but they
worked well with each other. As to me I was in charge of crafting a
part of gifts and particularly to ONE theme – Noah's Ark.
I've seen one interesting wooden Ark on Pinterest, a simplistic one, stained and with blueish patina, on
wheels. That gave a kick of inspiration like yes, I could give it a
try.
Truth to be told, the more I thought the more I realised,
just copying woud be boring, but that Pinterest Ark had a nice feel, that means
we needed something same, same but different.
Re-create the feeling, but with another object, a new one - that's where the most sleepless hours have gone. Some other Pinterest models had
an opening to maybe put a bunch of animals. That was a stumbling
point for me and a lot of time was spent figuring out how to make
the body of the Ark, so that it looked like a boat, like a real boat,
all rounded, but massive and bulky in a good way. Because Noah's Ark had to be bulky.
What I came up with finally was making a sturdy boat body, not a hollow one. I put four pieces of wood, glued together, got one piece 14 x 14 cm square, and sawn the edges off so that a boat shape came out. A nice edgy rounded shape.
The upper part was inspired by another
Noah's Ark, an old german shelf in a shape of Ark, looking like an old farmstead. Yes, I did some research on Arks, I didn't expect it'd fall into my lap, and most helpful results were the old documents, found on Pinterest, like illuminated manuscript pages, old models with particular, as I said, feeling around them, old illustrations. They all had something special, like details, harmony between elements and the main shape, it's difficult to describe, I repeat, it's a feeling.
Last but not least – at some point,
almost finishing the cuts I was thinking how to fill it or not (Playmobil, Lego Duplo animals), because the simple shape of
those ones would suit the Ark the best. And that's how this Ark got a
light garland. And turned into a night stand lamp.
It's possibly a bit too bright for a
baby night stand, looking more like a boat on fire than a soft night
light. And actually my friend-soon-to-be-mom needs to find another
safer solution, because this garland is getting warm, and that's not
great. Lets say, this garland was merely for gift presentation and to give some thought/visual stimulation how to use this Ark on purpose, or leave it as nursery
deco. As to me, I would maybe try to find the weakest lighting
garland and leave one or two bulbs on it, so that it gives only some
hint of light, creating a cosy and softened light.


Mosaic magnets - DIY with kids
This sunday was Mother's Day in France. We're not in France, and my kids are small to recall of the fact (6 and 2 y.o) AND my husband deployed (not in France, because otherwise he'd take note. As long as he's absent I'm not watching television, and stay much less online, otherwise I would take note). Long story short - we all happily forgot it. Until yesterday a friend of mine asked me. Her daughter came for a sleep over at our place, and this project fall quickly in place - the little girl and my little girl made both those mosaic hearts as fridge magnets. I am only sharing it almost as the Mother's Day has gone over - sadly. But you can make those magnets without any special Mother's Day notion, right? Let's move!
I've spent half an hour drawing, drilling and sanding. And we spent all together half an hour choosing mosaics and putting them together - fun part. Mosaics was very free style, because it was late evening and last thing I wanted was to art direct anything. I was simply happy sitting nearby and listening to their thoughts on subject: like, "Look, I'd like to make eyes here, and a nose". "On a heart?" "Well, yes, see, it's coming out nicely, isn't it?".
Next morning I've put plaster and varnish - another quick-n-easy step, better without kids, because you have to be quick, precise, and careful. Please meet the happy magnets with candy colors!
And happy Mother's Day for those celebrating it to french calendar!


Tuesday, May 5, 2015
A wooden elephant stand for a card
Let's get back to making more detailed DIY posts, right? Though my internet connection is still poor, and there's no amelioration in sight (yes, believe me, though I can hardly believe myself as I'm writing those lines), and the DIY's are longer, picture heavy, and hence demand more upload time, let's take a risk!
That elephant from the previous post - he needed a card, and he got one. Here's the break down.
That's not an ordinary card, all together that's looking more like nursery deco. It's a wooden elephant, made of three parts - equal in outline, and one of three (the middle one) is cut so that there's a slot when I assembled them. In this slot we put a card.
Actually why not make a simple double folded one, with an elephant on a cover and call it a day? Too simple, right? Yep - actually this card had to give place to eight or ten inscriptions, and in a double folded one that would look messy, and nobody would probably bother writing more. Keep reading - that's fun, and great, when people take time and write more - jokes, thoughts, comments, tipps, own souvenirs, anything that's longer than two lines. Hence this card would (and I'd outline and insist while giving it for inscriptions) to take time and write. Something special. Everybody can write something special if he/she takes time, I believe.
I wanted to make a folded card - sort of dividing it all in pages, yet being all on a one piece of paper. There're fabric inlets to divide, create some visual interest, and match the stuffed toy I've made previously.
Well, back to the elephant - it's a sturdy one, my plywood was 9 mm thick, threefold it brings to 2,7 cm, slightly over 1", so it stands pretty well. This elephant wasn't initially planned. It came as an answer to the question - how to make a folded card look nicely and not fall apart without any ribbons of other closing/holding together fussiness. The elephant was the answer, made as a stand, to slip the card into and hold it perfectly.
That's all, try it out, it doesn't take long if you have some basic sawing experience, pay attention to exactly where you cut, and have some patience for sanding. Mines weren't exactly perfectly equal, so yes, I've spent one evening watching a movie and sanding - but that doesn't sound that bad, right?
Tuesday, April 28, 2015
An elephant - stuffed toy for a newborn
A quick project to accompany a gift for a newborn girl - we had a ruffled gingham dress as a gift and that was a starting point to make a stuffed toy.


I had a piece of pinkish red gingham cotton, but making a stuffed toy mostly of that fabric perfectly according to a dress, would be neither fun nor challenging. The dress was just very pretty, but classic, maybe a bit too classic, so that was also a point - to find something to shake it up, and make it a bit more edgy, add a colorful and bold touch, maybe mix in other fabrics, and create more visual and haptic interest.
That's sometimes a bumpy road I mean, if you take a risk of making a doudou (stuffed toy) by yourself - what kind of animal would please, or wouldn't, can there be any hidden associations I'd possibly overseen? Will they like colors if I choose them like I feel and mostly if I have choice, neutrals are not on the plate, except the linen.
This one is double sided, with a day side and a night, sleepy side - it let me use more different fabrics on a relatively small and compact surface. I've taken neutral and black linen, a piece of wool, corduroy and cotons and also a piece of furry plush cotton for inner surface of ears.
Here we are with the mix and how it feels like - there are soft corduroy strips, bold color accents of Marimekko flowers, cooler linen and warm wool, and very cuddly plush ears in this elephant, some appliqué (eye, feet and trunk), and embroidery - all in all it's a piece pretty rich in texture and color. I will possibly sew a couple more of them. Let's see if this new thread Stuffed toy will get any other additions.
Sunday, April 26, 2015
A teddy bear house
I've already talked about them - as a gift for friends (who loved Andalusia a lot), which made a loooong way from the initial idea into the realisation. And I'm happy those bears have been insisting enough to stick to me and wait until I got them alive and made the house, filled with furniture, art, leisures and toys.
I really, really love them and it was hard to make them go, honestly. But I'm happy - happy they turned out like I felt they had to be, and that the house feels like home and it's just a happy and welcoming place for them.
Two days ago, as I was preparing this post for publishing for the first time, I've written a long story, with lots of me thinking, me doing, me trying, me asking, and other me's - it felt a bit over top. Now I just want to share those pictures with you and let them speak for themselves. Yes, it was a challenging, many times frustrating, very inspiring, instructive in so many ways, and finally fun process.
Look at them and enjoy. Right now I just focused on showing an overview, and bears themselves - they are pretty small - about 10 cm (4 ") as you see on a picture in my hand. Made in almost (because of felting) classic technique of teddy bear making - hand sewn, fully jointed, with needle felted muzzle, and glass eyes.
Everything in the house incl. the house itself have been DIY-projects, except of a toy train. Plywood, fabric, felt, prints, paper collage and paper napkins - more detailed posts and some tutorials are upcoming.
I'll come back and zoom on furniture and other pieces. Stay tuned!


Saturday, April 18, 2015
A room corner REMAKE: kitchenette & Co
Hey there, here's another post about
woodworking. In sad corners. I could have re-made it completely, but I thought more like of a challenge, and more of trying to develop/re-use the existing pieces.
See the first BEFORE-picture? That's
what's a sad corner means – randomly placed dispatched items, lots
of white space, not functioning with the rest, some other useful
things (world map) sloppily fixed, and generally a magnet for all kinds of clutter. Just not a happy spot to look at in a rather getting to be pulled together young girl's room - that's a sad corner. Do you have those guys in your place? I have a LOT!
So here're the consideration points:
- a thrifted and still cherished cupboard definitely too large for a re-painted BRIO toy stove;
- the greenish teal of a BRIO stove not working anymore – too dark, it makes this smallish stove look even smaller;
- world map too high and seemed to need a wooden support to live longer and not to peel off the wall every couple of days;
- some plants here and there wouldn't be bad;
- this wall would be a good place to display some nice treasures that don't need to be played with.
I have pinned some inspiration pictures
on one of my Pinterest boards (House living ideas), among others the original picture of
what a stove looked like – a red BRIO stove. Skip the next paragraph, or keep reading if you have a BRIO toy stove. A lot of details bummed me about this stove, and I need some more lines to make it clear. On the other hand, the imperfections of that monster made me create a nearly perfect kitchenette which my kids are happily both play with - now there's enough space on top surface and around. WITH storage.
So, dear BRIO - here we go - I guess on that
Pinterest picture, the same as at our place, and this is the general
problem of that BRIO stove – it's way too small to look good with
anything not-too-toy'ish. Try to pair it with anything else that is not a toy, like a thrifted cupboard (our situation), or other neutral shelves (you'll find many examples on Pinterest) and this stove
instantly looks tiny. Very tiny, and disproportional.
This cupboard is the smallest I've found in a
thrift shop (only 50 cm large), but it's looking huge, next to the
BRIO (only 38 cm). Another question – finishings – cheap, white
plastic, cut shorter as the main pieces, hence looking very imperfect. AND there's simply not enough space to move around, let alone the storage question.
All that being said – I took the
front piece of the bespoken stove, I like it, and off it went into creating a
larger version, integrating a DIY-sink and offering some more top space.
Other inspirations I wanted to make
work together were:
- a mirror, with a frame imitation old silver (had one, it spent six years waiting for a come back);
- a box underneath it to put small bracelets, silk butterflies, and other precious embellishements a little soon-to-be six years old girl keeps loosing everywhere otherwise;
- a floating shelf to display some nice paraphernalia;
- cacti and/or other indoor plants.
Floating shelf has been made, a jewelry
box is another 100% DIY because of the mirror measurements. I've also bought a small cactus and a plant.
I will come back one more time and show
you the corner one more time. It's getting happier, and the new-old
BRIO stove will get a light paint soon. Stay tuned.


Tuesday, April 14, 2015
A wooden house
Hey there! Lately I've been permanently talking about woodworking. Now it's time to share some peeks, right? And make a new tag here on the blog. Well let's go then!
That's a wooden house, a very simple one. Yes, I could have bought it ready-made, but I find them a bit overpriced (at least here, in Finland), and then a ready-made wouldn't quite perfectly fit the inside I was going to make (neither measurements, nor in character/appearance). It took me one year longer as expected (mostly waiting time). You'll see more of this house later, as soon as I have better pictures. It's been made of plywood, and it'll be a home for three teddy bears (stay tuned, another post is coming soon).
This is a custom order, which influenced what is inside: my friends' reading/studying preferences, their favorite leisures, arts, travel "coups de coeurs", and a such. They moved in a new house and that is going to be kinda gift for them. They moved in last year by the way, and at that time back then though I knew I'd love to realise the idea, or sort of vision I had for them - a teddy bear house, - I had no clue how to pull it all together. That's normally not bumming me, but last year as I started, I had made really, really bad pieces.
Turned out woodworking was a bit trickier to learn, and it took me some time to find out techniques, feasibilities, source out the tools, better organize my smallish work space so I'd be able to work efficiently. I put this project on hold , yep, for almost one year, that sounds crazy, as I'm writing those lines, but this year went fast.
And then came the moment last month when I knew I could make it better, faster, and actually bring to life what I had vaguely in my head. I've been working with my simple wood processing tools (a jigsaw and a router) since a couple of months, preparing my crafting class for kids, making shelves, boxes and a such for our home, it was getting more fun than frustrating/painful, and there was some sort of confidence though still a weak one that this project could finally work out, leave my head and live out there on its own.
All in all I had a carte blanche about this house. I asked a few questions about the above mentioned leisures, readings, travels, got some good responses with additional options and off it went into a very busy and fun creative research trying to make all those particulars work on a very reduced space (appr. 35 x 20 cm surface).
There're some fun things I've tried out at this project and I'm going to come back and show you more of that, with some tutorials and more details. This house is almost ready now. Come back next week to see more!
Friday, April 10, 2015
Album with children's drawings
There's another album, another gift - a teacher's assistant is leaving and we made with kids an album to say THANK YOU.
Recently I've got a punching-&-binding tool, which is rather simplistic, but I wanted to get started to make more profesionally looking albums, and was not ready to invest a lot into a more high-end device. Some details bummed me about pricier models, so I keep waiting. Anyway I got one, a reasonably priced starter model, that promised to punch thick cardboard (mine was about 2,0 strong), and it's working not bad.
This album went all crazy about colors, which happened accidentially. It was planned with many softy pinks and oranges, and some greens, and yes, vivid yellow hues for daffodils, but I got some drawings on colored paper, like hot pink or neon yellow, so I had to add more energy to the whole thing and shake it up. And as kids drawings are spontaneous, the album had to get more playful and less orchestrated as well. That's how it turned out more graffit-y, and merged, and experimental with unexpected elements. But you know what? That's normally where all the fun begins.
Anyway, the binding device did a great job - see the cover? I wish I had left the pages two days longer under heavy pressure, because I was not able to get good pics - the edges were slightly wound up (not a big deal, but tricky for photograph) - lesson to learn for the next time!
Sunday, April 5, 2015
Easter ANGELS - DIY tutorial to craft with kids
This post has been scheduled.. for
december!
We've made small angels back then in this technique and gave them to a friend. I've cut wood and prepared the supplies, the kids have applied paints, made hearts of hama beads, salt dough ornaments, and glued all the elements. They've been in other colors in december though. And all I managed to do was squeezing a picture of them into one of „round-up“ posts. I missed the occasion to share a tutorial before Christmas, which I repented a lot, and then it didn't fit in anymore. Until Easter.
Making angels for Easter suddenly made sence, hence I got out the supplies, polished the old tutorial pictures, we made a new serie in spring colours and here we go. All the usual suspects, my friends – wood, wooden beads, virgin wool, some decorative elements.
Happy Easter crafting!
Subscribe to:
Posts (Atom)